

Dharmarajsinh Jethva
Joined 01-17-2023

...

...

...
...
...
 Dharma Jethva
Prerequisites: JavaScript, Node.js, async/await, Promises, ExpressJS
Versions: Node.js v10+
Read Time: 60 minutes
Are you ready to dive into the wonderful world of chat apps? In this beginner-friendly tutorial, we'll help you build your very own chat application using the infamous Socket.IO library for JavaScript!
You'll learn about the following:
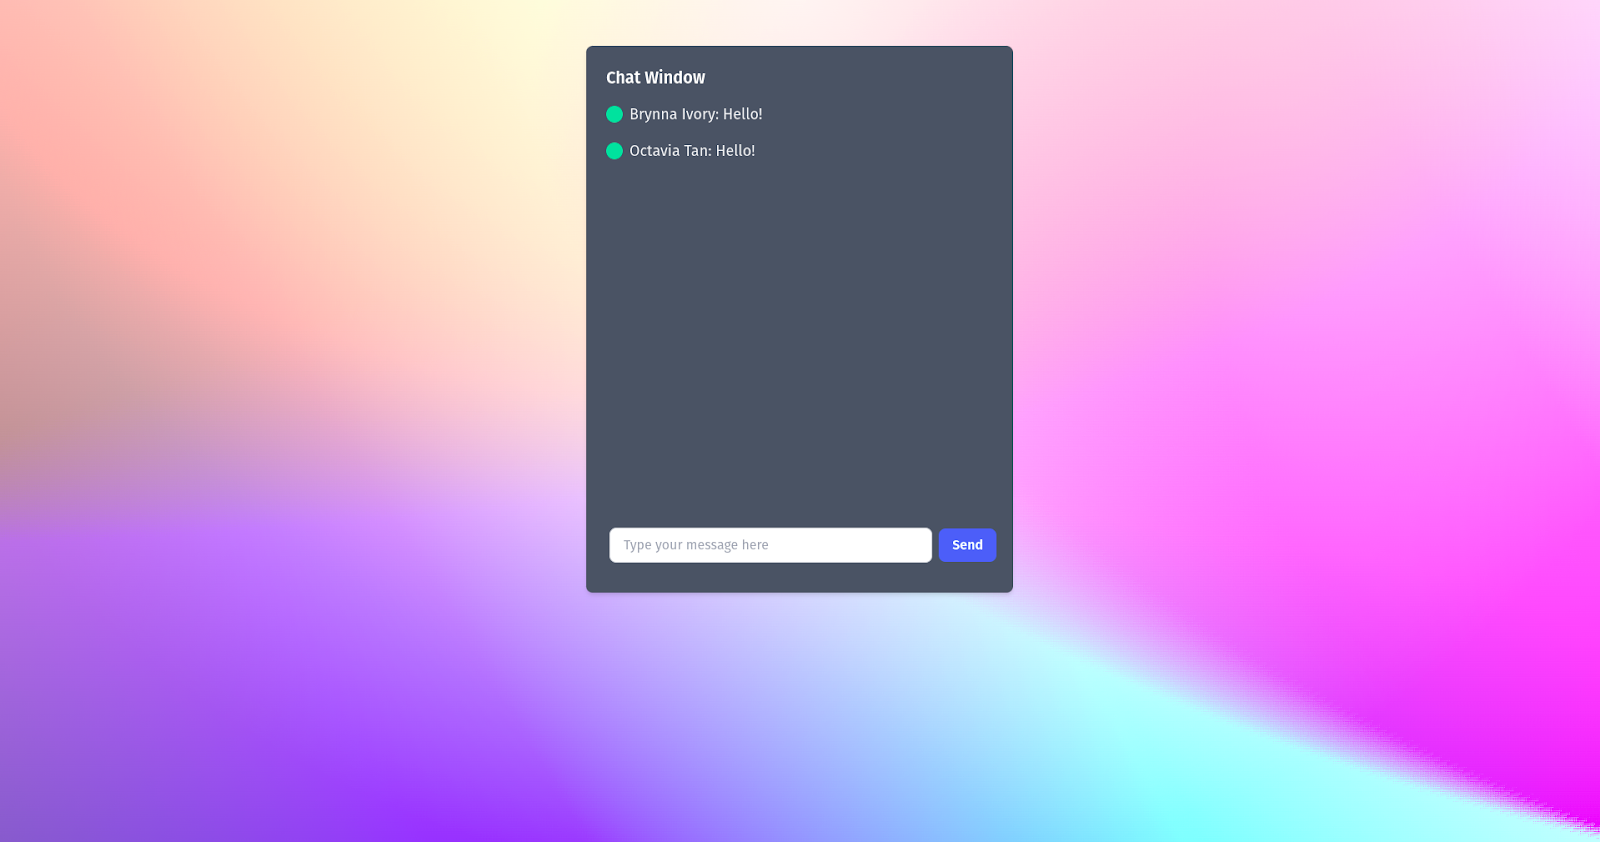
By the end of this tutorial, we'll have a chat application that looks and works like this:

For those who want to directly jump into code, you can start at the “Setup” section.
Without further ado, let's get started!
All chat applications need a functional connection between the user-facing chat window and the chat server. The traditional HTTP protocol is based on the request-response architecture.

For example, when a user types “www.codedex.io” in their browser, they are requesting that another computer respond with a specific page. The user must initiate the request first, before the computer (or server) can respond. In this case, the server responded with the webpage that was stored at the location www.codedex.io. The key step being the user initiated the request. The server can never contact the user without the user initializing the request first.
This system wouldn't work in a chat application because it requires real time communication. For example, let's say user A, user B, and user C are connected in a chat and all three of them send a message. However, user B never requested for new messages to be sent as a response because user B wasn't aware that there were new messages being posted. Then, the chat would immediately break.

To prevent this, whenever a new message is posted, everyone involved in the chat should automatically receive it without ever having to request it from the server. Since the request-response architecture would never work, we need a new set of communication rules that will enable both sides to send messages instead of just one side always making a request and another side always sending back a response.
The WebSocket protocol allows both the browser and the web server to independently send and receive messages from each other in real time. This means that messages can be sent from the browser to the server, and the server can send messages back to the browsers without needing any formal request.

Now that we've got the concepts down, it's time for some real-time (pun intended) code in action.
Let's begin with some starter code by downloading this GitHub repo.
In order to download the starter files, follow these steps:
<> Code.The folder should have the following contents in it:
Once you have this setup, open a new terminal window at this folder's location. In the window, enter the command npm install.
While the dependencies are being installed, let's go over the folder structure to understand what files we'll be working with.
In the root codedex-chat-app/ directory, there are two directories available:
We'll be working in the server-starter.js file. At the end, it'll have the same code as the server-completed.js file. Alternatively, the server-completed.js file can also be referred to if anyone gets stuck in the middle of this tutorial.
In this section, we'll focus on setting up our web server and web socket server.
Open the backend/server-starter.js file. At this point, you'll find some import statements at the top of the file:
// server-starter.js file

import { uniqueNamesGenerator, colors, names } from "unique-names-generator";
import express from "express";
import http from "http";
We'll need these to create our web server which will send HTML pages that will connect to our WebSocket server in order to chat and we'll be using a random name generator to generate usernames for people joining in the chat.
Below these lines, we'll write our first piece of code under the comment labeled // write code here for step: 1.
First, let's import the socket.io library in order to create a WebSocket server and write the following code:
// server-starter.js file

// import the socket.io library
import { Server } from "socket.io";
Next, we need to initialize the servers since the relevant libraries have been imported. Go down to step 2 and add the following:
// server-starter.js file

const app = express();
const server = http.createServer(app);
const io = new Server(server);
In the code above, we created a new express app variable to form both the HTTP and WebSocket servers, via http and socket-io respectively. The web server will be responsible for sending the page back to the browser with the visible chat window and the WebSocket server, named io, will be responsible for our chat functionality.
Note: Per the Socket.IO naming conventions, we named our WebSocket server io.
At this point, we can start the server by running the npm run serve command in the terminal. If everything worked correctly, you should be able to see the following output in your terminal window.

Note: If this doesn't work, you can try again or join the Codédex Discord server where our Code Mentors will help you with the problem you're facing.
If the server is functional, it will be listening on port 3000. We can now open our browser and visit the http://localhost:3000/ URL. This should show us a very beautiful chat application page.

We've got the HTTP web server working! 🎉
Behind the scenes, our HTTP server is simply taking the index.html file and script.js file (inside the frontend/ directory) and serving the updated index.html file back to the browser. The index.html file is responsible for showing all of this UI to us in the browser.
But, the chat functionality doesn't work at this point since we haven't set up the WebSocket server necessary to chat. So, let's do that now.
For every chat session, there is a connected chat history. Everytime we open a chat application, we can find the previous messages. For the sake of simplicity, we won't be creating a persistent chat that'll be stored even after the server goes offline. So, for our use-case, we'll create an empty array and call it chatHistory. This chatHistory array will lose all its contents every time the server goes offline or it restarts.
Go back to the server-starter.js file and find the comment that says step 3 and create a new empty array called chatHistory.
const chatHistory = [];
After that, we need to receive the connection requests from the user-facing frontend that is trying to connect to our WebSocket server backend.
To do that, let's go to step 4 and start by using our io WebSocket server object:
io.on(“connection”, function callback(socket) {
  console.log(“connection successful”);
});
Let's understand what we did here. So, first of all, we called the io object's .on() method that requires 2 arguments:
”connection”).callback() function that will be automatically executed when the “connection” event occurs. In our case, this function is simply printing out when a user successfully connects to our backend.Saving the file and refreshing the browser tab should show new console logs in our terminal console like so:

Now, although we won't be editing any of the frontend code, let's understand how we will be connecting to our WebSocket server backend. To do that, go to the frontend/ folder and let's open the /index.html and script.js files.
Inside the index.html file, we're getting the socket.IO library code first using the following line in our <head> element.
<script src="https://cdn.socket.io/4.5.4/socket.io.min.js"></script>
This line allows us to use the socket.io package on the frontend.
Note: The packages for the frontend and backend consist of different code even though they're both called socket.io.
So, let's open the script.js file and take a look at the following line:
const socket = io();
We're only able to do this because we included the earlier script in our index.html file, or else this would throw an error.
This line is handling so many important steps behind the scenes,such as:
These are just some of the core tasks it's performing. But, because of this line, we get the ”connection successful” printed in our console.
Let's continue with our backend server-starter.js file. So, going back to the callback() function inside our ”connection” event, let's generate a unique username for a new user who joins the chat. The boilerplate is already provided so we just need to call the getUniqueUsername() function and then assign it to a new username variable and print it in the console.
io.on("connection", function callback(socket) {
  const username = getUniqueUsername();
  console.log(`${username} connected`);
});
Now that we've handled the connection, before continuing with the chat logic, let's also handle the disconnect case. In order to do that, we need to understand what the socket parameter is and how to use it.
In the callback() function, as seen above, the socket parameter is a very important object that lets us interact with a connected client. One can think of the socket parameter object like a personal mobile phone. Today, everyone holds a personal, Wi-Fi-connected phone. Even though everyone is connected to the Wi-Fi router, the way each person uses the internet is completely personal and different for them from everyone else. Similarly, each time a new chat client connects to our server by opening a new window/tab and going to http://localhost:3000/, the callback() function is run and it generates a unique socket parameter pertaining to only that particular connection.
Therefore, we can use this parameter to listen for a ”disconnect” event that is triggered when a client closes the tab or the browser.
io.on("connection", function callback(socket) {
  const username = getUniqueUsername();
  console.log(`${username} connected`);

  // newly added code
  socket.on(“disconnect”, function() {
    console.log(`${username} disconnected`);
  });
});
Using the socket object, we've added an .on() event listener which will trigger when the ”disconnect” event occurs and it'll notify us that the client has disconnected.
Notice how we added the event listener to the individual socket object and not the io object. That is because we only want to know information about which particular socket session (or user) is being disconnected and not all of them.
Alright, we're very close to building out the fully functional chat application. We just need to incorporate the logic to allow users to send messages, save those messages, and send those messages back to everyone in the chat.
In order to do that, we'll first start with our frontend logic to see what custom events have been created to signify that a message is being sent when the send button is clicked. Inside the script.js, we'll see that an event listener is executed when the “submit” event takes place.

The function body is executing another function called sendMessage(). This function is using the socket object and emitting a new event called ”post-message” which sends the value of the text currently typed into the input box to our WebSocket backend server. This message is transformed into an object with the message property.

Therefore, we'll create a new event listener which listens for ”post-message” on our backend. Going back to the server-starter.js file, we'll add the following code:
io.on("connection", function callback(socket) {
  const username = getUniqueUsername();
  console.log(`${username} connected`);

  // newly added code:
  socket.on("post-message", function receiveMessage(data) {
    const { message } = data || { message: "" };
    console.log(message);
    chatHistory.push({
      username,
      message,
    });
  });

  socket.on("disconnect", () => {
    console.log(`${username} disconnected`);
  });
});
We've now added a ”post-message” event listener that is being sent from the frontend. This event listener also takes a receiveMessage() callback function that receives the data being sent from the frontend in the form of an object with the message property.
Once we've received the message, we log it to our console. For example, if we type in Hello! in our input box and send it, it'll be printed like so:

So, we're now able to connect to the user, and send messages to the server. What's left? We need to add the ability to send those messages back to the user who sent the message as well as all other users in this chat.
To do that, we'll add some more code inside the receiveMessages() callback function as follows:
io.on("connection", function callback(socket) {
  const username = getUniqueUsername();
  console.log(`${username} connected`);

  socket.on("post-message", function receiveMessages(data) {
    const { message } = data || { message: "" };
    chatHistory.push({
      username,
      message,
    });

    // newly added code:
    io.emit("receive-messages", {
      chatHistory: getAllMessages(),
    });
  });

  socket.on("disconnect", () => {
    console.log(`${username} disconnected`);
  });
});
Notice how we switched from using the socket object to io object. This is because when a user sends a message, the user isn't the only one who should receive the message, right? Everyone in the chat should receive it.
We also changed the method from .on() to .emit() because this time, the WebSocket server backend wants to create and send a new event to all the connected web browsers in the chat. Similar to the .on() method, the .emit() method also takes in 2 arguments:
In this case, the data is the entire chat history that includes all the messages that have been sent by the users as well the usernames.
At this point, our messages that we sent should be visible to everyone in the chat like so:
The final piece in this chat app puzzle is to receive the chat history once you're connected to the backend. As of now, the chat history only appears when the user first sends a message. We want to display the chat history even before the first message is sent.
To accomplish this, we'll send back the entire chatHistory right after a user is connected by adding the following code:
io.on("connection", function callback(socket) {
  const username = getUniqueUsername();
  console.log(`${username} connected`);

  // Newly added code:
  socket.emit("receive-messages", {
    chatHistory: getAllMessages(),
    username,
  });

  socket.on("post-message", function receiveMessages(data) {
    const { message } = data || { message: "" };
    chatHistory.push({
      username,
      message,
    });

    io.emit("receive-messages", {
      chatHistory: getAllMessages(),
    });
  });

  socket.on("disconnect", () => {
    console.log(`${username} disconnected`);
  });
});
Every connection to our WebSocket server now emits an event which sends back the entire chatHistory, along with the randomly generated username, back to the connected user. But notice how, this time, we're emitting the event using the socket object and not the io object. This is because the user who just connected needs to receive the chat history and not everyone already present in the chat since they'll already have received the most recent chat history.
Bravo! You just built a chat application! 🥳
You can test it out by creating 2 or more tabs in your browser and sending messages!
Let's look at all of the code written in the server-starter.js file.
// imports required for server
import { uniqueNamesGenerator, colors, names } from "unique-names-generator";
import express from "express";
import http from "http";

// import the socket.io library
import { Server } from "socket.io";

// initializing the servers: HTTP as well as Web Socket
const app = express();
const server = http.createServer(app);
const io = new Server(server);

// create the chat history array for storing messages
const chatHistory = [];

// listen for new web socket connections
io.on("connection", function callback(socket) {
  const username = getUniqueUsername();
  console.log(`${username} connected`);

  // send the chat history to the client
  socket.emit("receive-messages", {
    chatHistory: getAllMessages(),
    username,
  });

  // listen for new messages from the client
  socket.on("post-message", function receiveMessages(data) {
    const { message } = data || { message: "" };
    chatHistory.push({
      username,
      message,
    });

    // send the updated chat history to all clients
    io.emit("receive-messages", {
      chatHistory: getAllMessages(),
    });
  });

  // listen for disconnects and log them
  socket.on("disconnect", () => {
    console.log(`${username} disconnected`);
  });
});

// Boilerplate code as well as Bonus section
// HTTP server setup to serve the page assets
app.use(express.static(process.cwd() + "/frontend"));

// HTTP server setup to serve the page at /
app.get("/", (req, res) => {
  return res.sendFile(process.cwd() + "/frontend/index.html");
});

// start the HTTP server to serve the page
server.listen(3000, () => {
  console.log("listening on http://localhost:3000");
});

// helper functions
// get all messages in the order they were sent
function getAllMessages() {
  return Array.from(chatHistory).reverse();
}

// generate a unique username for each user
function getUniqueUsername() {
  return uniqueNamesGenerator({
    dictionaries: [names, colors],
    length: 2,
    style: "capital",
    separator: " ",
  });
}
View the full source code here.
Once we fully understand how the core chatting function works, we can build more features such as:
Once you've finished this project, feel free to post the images of the functional chat app on Twitter and tag @codedex_io and @coder_kun_.
Need Help?
Joined 01-17-2023